Showing posts with label sewing. Show all posts

Thursday, April 23, 2015

All progress, no follow through


Does this ever happen to you? In the middle of 15 things, and nothing quite makes it back into its home?


Ah, there we go. Space to work.

I've recently started using this new list keeping app that I LOVE. It's called TickTick. I think I found it via googling something like "shareable mobile and desktop to do list," or something very technical like that. Let me count the things I love about this app! I have a bunch of lists for things like groceries, target, honey-do....and now I can simply add my husband to them and we BOTH have the list, LIVE in our pockets. Now when I need to stop at the store, I can see what he has put on the list and vice versa, without having to remember if I actually added to my list the thing that we were out of.... I can also add alerts for when things are due, AND integrate it into my calendar. And while that's all fantastic, I have also been using it for my "neverending sewing list" and my "neverending yarn list" and my "neverending Etsy list" (yes, I will re-open someday, but I've put it on vacation mode now as my vision and my mojo aren't quite clear at the moment). All of this rambling to say that I reserved myself a sewing day one weekend, and I wasn't just sitting there thinking....now what was I going to do with all this time? Watch TV and take a nap? Oh no, I was productive.


I made myself a couple of drawstring knitting project bags. I immediately put them both into use and didn't take any finished object pictures. They are just the right size for a pair of socks or a few preemie hats, and they look pretty sticking out of my purse.


I made a couple of fabric headbands upon request, which turned out really cute! I also did not take pictures of any of THESE finished objects. I did add one for myself to the list (the boring gray one - it's navy on the reverse and can be worn either way) in hopes of encouraging them to be worn for more than 5 minutes, and I'm happy to report that it's super comfortable! I have a high forehead which benefits from bangs day to day, but I do like to pull them back to exercise (haha) or when I'm doing a lot of looking down, like when I sew or sketch. Because I also wear reading glasses, I always worry about headbands causing too much pressure at the temples and giving me headaches, but this one fit really nicely!


Finally, and the ultimate reason I planned this free day for studio time, I worked on a project for a dear friend who is expecting her first little one this summer. All in all, it was a perfect excuse to set aside the time to get some stuff done, and was quite an enjoyable day!

Now, to just get around to those after pictures....

Wednesday, April 22, 2015

Quilt update

At last update, my hand pieced quilt looked like this:


It was about 1/4 to 1/3 done. I've been trying to make this my primary project in the evenings, as it has not escaped me that I said in response to a commenter, "Hopefully it won't take me a year. It would be nice to be done by the time the snow flies!" Not only has snow flown and stopped (and started again briefly this morning, but we won't discuss THAT nonsense!) ...but we're about four months shy of that year mark! (also, if you're curious about WHY in the world I decided to hand piece a twin sized quilt, I talk about that in this post as well.)

Last night I unrolled the actual quilt batting rather than my makeshift kitchen rug template. (Night time photo = sort of wonky colors. I did my best with what the Picasa editing tools can offer - close enough!)


The pink flower in the foreground is loose, so I used it as a rough scale and counted it off around the edges. By my estimation, I have about 18-20 full flowers to go, and maybe a bunch of partials depending on how I decide to finish off the edges. I've been doing about 3-4 flowers a week....so maybe another two months? Maybe I can sneak in the finishing before that one year mark?


I can't believe I've been picking away at this for nearly a year! It's going to look so strange when it finally lands on a bed instead of draped across a chair, half backed with a bunch of cardboard. I'm not sure if I'll be able to give up first snuggling rights. We might have to share!


Thursday, April 9, 2015

A bunny for Easter

If you've never read Posie Gets Cozy, the blog by Alicia Paulson, I won't be at all insulted if you click over to her blog, get lost, and never come back here. Her life seems like the perfect weekend day I can never quite manage to have, AND they've been having dress and sweater weather in Seattle for a while now, which I'm jealous of as I contemplate between heavy spring coat and down jacket on the daily. She does beautiful sewing and embroidery projects and sells patterns and kits on her website. About 6 months or so ago, I purchased the pattern for Miss Maggie Rabbit and have been not patiently waiting to have enough time to dig in and make her up. I'd actually hoped to do it for Christmas but ran out of time. That's ok, because Easter is a perfect, if not obvious, time to gift a little bunny.


(I also finally discovered the magic of freezer paper. So much better than pinning it all out!!)

You guys, I loved making this little softie so much. Everything but her dress was sewn by hand, and it falls right into my recent love for hand stitching. I've made a few machine sewn softies in the past year with the felt you buy in sheets from Joann's, but this time I sprung for the recommended National Nonwovens wool blend felt from Prairie Point Junction, and I don't think I'll ever go back! Other than shipping, it's not that much more than the polyester stuff, and it was a joy to work with. It's much thicker and smoother than the craft store stuff, and I'm hopeful that it won't pill as much as the bunny gets loved.


I'm normally a modern, graphic print kind of gal, but the pattern pictures for this sweet bunny had me pushing myself to go for softer, more vintage looking prints like this one for the lining of the little bunny ears.


She has little boots. I mean, come on. Seriously, so cute. One addition I made was a fuzzy little pompom on her tush for a tail. Some of us are really into tushies and puffballs recently, so I had to. Of course, I didn't photograph this, but trust me, it's cute and worth it. I contemplated waiting to write up this post until I took some fancy finished object photos of Miss Maggie, but the reality is that I'll probably never get around to it. I've been finding that I'm more busy with life than with the documenting of it at the moment, and I think that's ok.


I got this one nighttime shot of Maggie all ready to go in her basket, with bunny jammies as a blanket on a bed of seriously messy paper grass. I went back and forth about knitting her cape, but I'm glad I did. The little dress looked a bit too much like jammies without it. Of course, Maggie is currently nakie other than her boots, which I intentionally sewed on because I was not about to tie and re-tie embroidery floss laces. The best news is that Miss Maggie Rabbit is currently quite loved, and that's the best part of any handmade gift. I won't even mind if she pills, because it's a sign of having been snuggled. I have the itch now to make more felt softies!!


One final Easter note. I tried the Pinterest recipes for natural dyes 2 years ago, and had a total fail. Either they did nothing at all to the eggs, or in the case of the no fail turmeric dye, they just peeled right off the shell! Last year I went traditional and got actual color from a Paas kit, which was fun and no-fail. This year, I found a crazy expensive natural dye kit ($10, for those wondering what crazy expensive in terms of egg dye is), and gave it a shot. Fortunately/unfortunately, it worked great! The dozen eggs we got were a mix of brown and white, and this kit even colored the brown eggs on the right of the carton above. It took much longer than a Paas kit, as the eggs soaked for 15-20 min rather than 3 or so, but we just did some coloring in between and set the timer to check on them. I might try this again next year....or maybe I'll try the food coloring version that's floating around Pinterest this year. :)

Thursday, March 26, 2015

When you don't love it


In my last post I mentioned cutting out some fabric for a dress I planned to make. I also mentioned that I've been avoiding this particular project because I wasn't sure I was going to like the pattern. Obviously, I like the look of the end product because I had decided to make it, and purchased all the trim and lace for it....but I have made another dress out of this book and I did NOT enjoy the process. The directions were ok, but I had to do a lot of adjustment on the fit. I brought the shoulders of that particular dress in, did sort of an improvised dart so they didn't gape in the back, and left an entire tier of ruffles off the dress, as it was plenty long enough for its above average height recipient.

The only reason I didn't entirely scrap my plans to make another dress by this designer is because dress number two is much less fitted, and I decided that oversized would be fine for now and it could be worn as a tunic over leggings in the future. Something grabbed me this weekend, and I decided to make the second dress.


I like the dress. But I was right. I did NOT love the pattern.

Many parts of it felt incredibly fiddly, and sometimes I would go ahead with the directions as written, hoping that it would work out but knowing that I was going to be ripping a seam and doing it again. You can see from the back image that there are ties at the waistband. I know for sure that there were directions on how to make those ties, but I am less certain that there was ever a direction to actually attach them to the dress! Luckily this is not my first dress with ties like this, so I was sure to attach them before I sewed the final side seams. I imagine I would have been quite frustrated if I hadn't noticed that, finished the dress....and ended up with spare parts!

The directions for the button band on the back were rather mystifying as well. This is one feature I haven't done much in the past, so I was really relying on the pattern instructions. The band is cut out as a single strip. All of the times I read through the directions, I really felt like it should have been two separate pieces, but I didn't want to slice it in half only to find out I was wrong. I checked and double checked the pattern piece to make SURE there wasn't another cut line, and there wasn't. I went ahead and installed it as best I could....got down to the bottom of the band, had no idea how I was to navigate the transition between left and right side, and out of the lateness of the hour and just wanting to be done, I folded and mashed it as best I could to look decent and called it a day.


It looks fine for a toddler/kid dress I suppose, but I know it's not the proper way to do it and it bugs me. Not enough to rip out, but enough to want to research it for next time. On the other hand, how pretty are my buttonholes! Score one point for practicing it five times before doing it on the garment!


So here is my dilemma. I've now made two patterns from this book, and I disliked them both. I was surprised at many of my issues because, well, they came from a BOOK. In my mind, you should be able to trust what you get out of a book from a real live publishing house. There should have been multiple sets of eyes on it, patterns should be tested, fits should be reasonably accurate. This wasn't a freebie pattern (though, disclosure, I got this from my library so I didn't technically pay for it), so I just expected more. The dilemma is....to name names, or just make a mental note to myself and move on?

I have no problem posting names and links and such when I have a good experience, but I somehow feel bad pointing a finger when I had a less than good experience. I know I don't have a large following, but I guess I feel like I should prevent others from having the same problems. On the other hand, I'm not the world's most experienced sewist, and I don't always read directions carefully, and I'd hate to paint someone else in a bad light if it was really just errors on my part.

What are your thoughts?

Monday, March 9, 2015

Hand Sewing and Making Scraps


I have so been so enjoying hand sewing this quilt top lately! All those tiny stitches are so soothing to me right now. I'd say I'm....about 1/3 of the way through. I measured out my kitchen rug, and it's roughly the size of a twin bed, so I'm using that as my reference point.

I ran out of hexagons that I'd pre-cut at the beginning of this project, so I needed to get more. (Oh, I've been informed that it wasn't actually my dad who spilled the wine, but I'm fairly certain that it was his glass, which must be why I remembered it that way.) I don't actually have any kind of color plan for this quilt! I'm mostly using stuff I have around, or leftovers from other projects so far. My only method is that each flower has a white center and some kind of print on the petals. I'm trying to spread around the colors, and find a mix of fabrics that I like and those that a toddler might like, because that's the intended recipient. The room that it will live in is orange, gray and green, so those are present, and pink is a favorite color so that's there as well.

But as I said, I ran out of cut hex's. So...what to do? Well, I made more! These are from a quilt (my first) from my bed, and the apple print was a remnant that is both a doll dress, and what was going to be a knitting project bag for me, but was quickly appropriated by the owner of the doll dress because of how it matched.


Then....I was sort of out of leftover cotton fabric. I had some more sitting around though that was earmarked for projects, so I decided to cut out those projects now so that I could scavenge my made leftovers.


The cutting table still needs trim and stain, and the drawers are wonky....but I LOVE it. It made the cutting and piecing of a pdf pattern so much easier than chasing it around on the floor, or hunching over my dining table. I'm so pleased with a large work surface at standing height that I can't even believe it. 


This crazy blue is intended to be a probably crazy toddler dress. I've made one other dress from this book (I can't recall if I blogged it) and honestly I didn't love that pattern. I had to make a lot of fit adjustments, but the end product is quite well loved. And yes, its scraps are already in the blanket. And also in this hat actually! I tend to overbuy yardage. This dress is a much less fitted design than the first one I did, so I'm hopeful that I won't have to make any adjustments.


I've also been intending to make some more project bags. This time I gave a zipper a go, using this tutorial. I made the medium size, because I'd picked up two 12" zippers. I was hoping it would be sweater sized, but it's a bit small for that. Maybe it would be good for a kids sweater or a shawl. In either case, I had a good time practicing with it. I'm not great at inserting zippers, and I did a decent job this time. Basting. Sort of key. Yep, my lazy self needs to quit skipping that step!


Such an adorable, springy little pouch! I think for my next one I'll add a little loop or something on the zipper pull side, which will be the same size as this one because as I said, I have a second 12" zipper. Then I'll have to get my hands on some bigger zippers to make larger sizes.


In the meantime, I'm putting the scraps into service already.

Tuesday, February 24, 2015

Highly Irregular

For a moment, I'm between large knitting projects. I've recently finished my Bleecker Street cardigan and my Prairie Ridge Shawlette (SCARF). In the time since I've last posted I whipped up a 
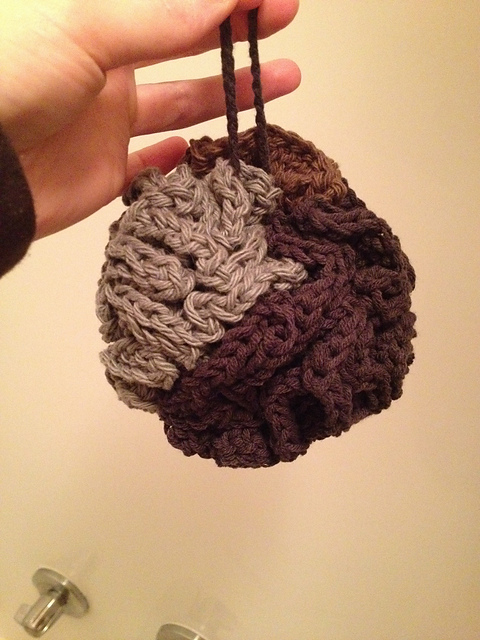
bath puff with some cotton scraps and a 
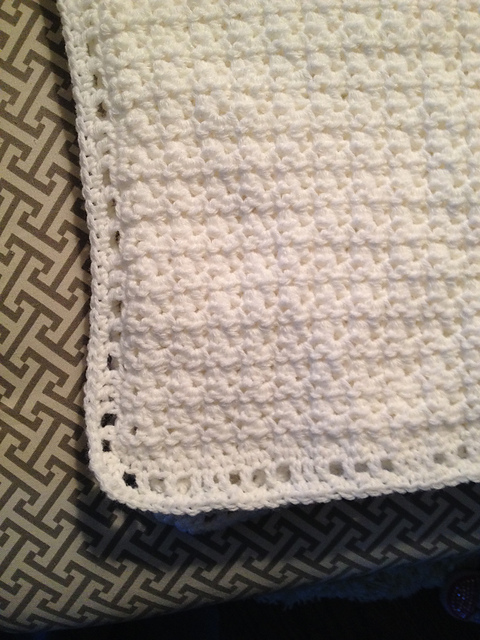
simple baby blanket to use up one of those pound of love skeins that was taking up space in my stash. (And yes, I DO think that the light gray bits look like brains!)


I've swatched (to check for gauge) for a new sweater, and even washed my swatch, but I haven't gotten around to measuring it yet to cast on. It's a fingering weight cardigan and I just don't know if I have the mojo to start that at the moment. I've matched up my other sweater quantities of yarn with projects they'd like to grow up to be, but the light cardigan is the only one I currently own the pattern for, so it jumped to the top of the list. Use what you've got, right?

So in the meantime, I decided to pick away at that hex quilt I started many moons ago. Oh, this project feels a bit troubled to me! Several months ago, my parents were over and my dad knocked a full glass of red wine over......right into the bag holding my paper templates, finished block or two, and pre-cut fabric. I was a bit in a "throw the baby out with the bathwater" mood already when that happened, but my husband kept a level head and washed all the fabric in an oxyclean soak and laid it out flat to dry. In the end it was all saved, but I was annoyed by the whole thing, not to mention my behavior.

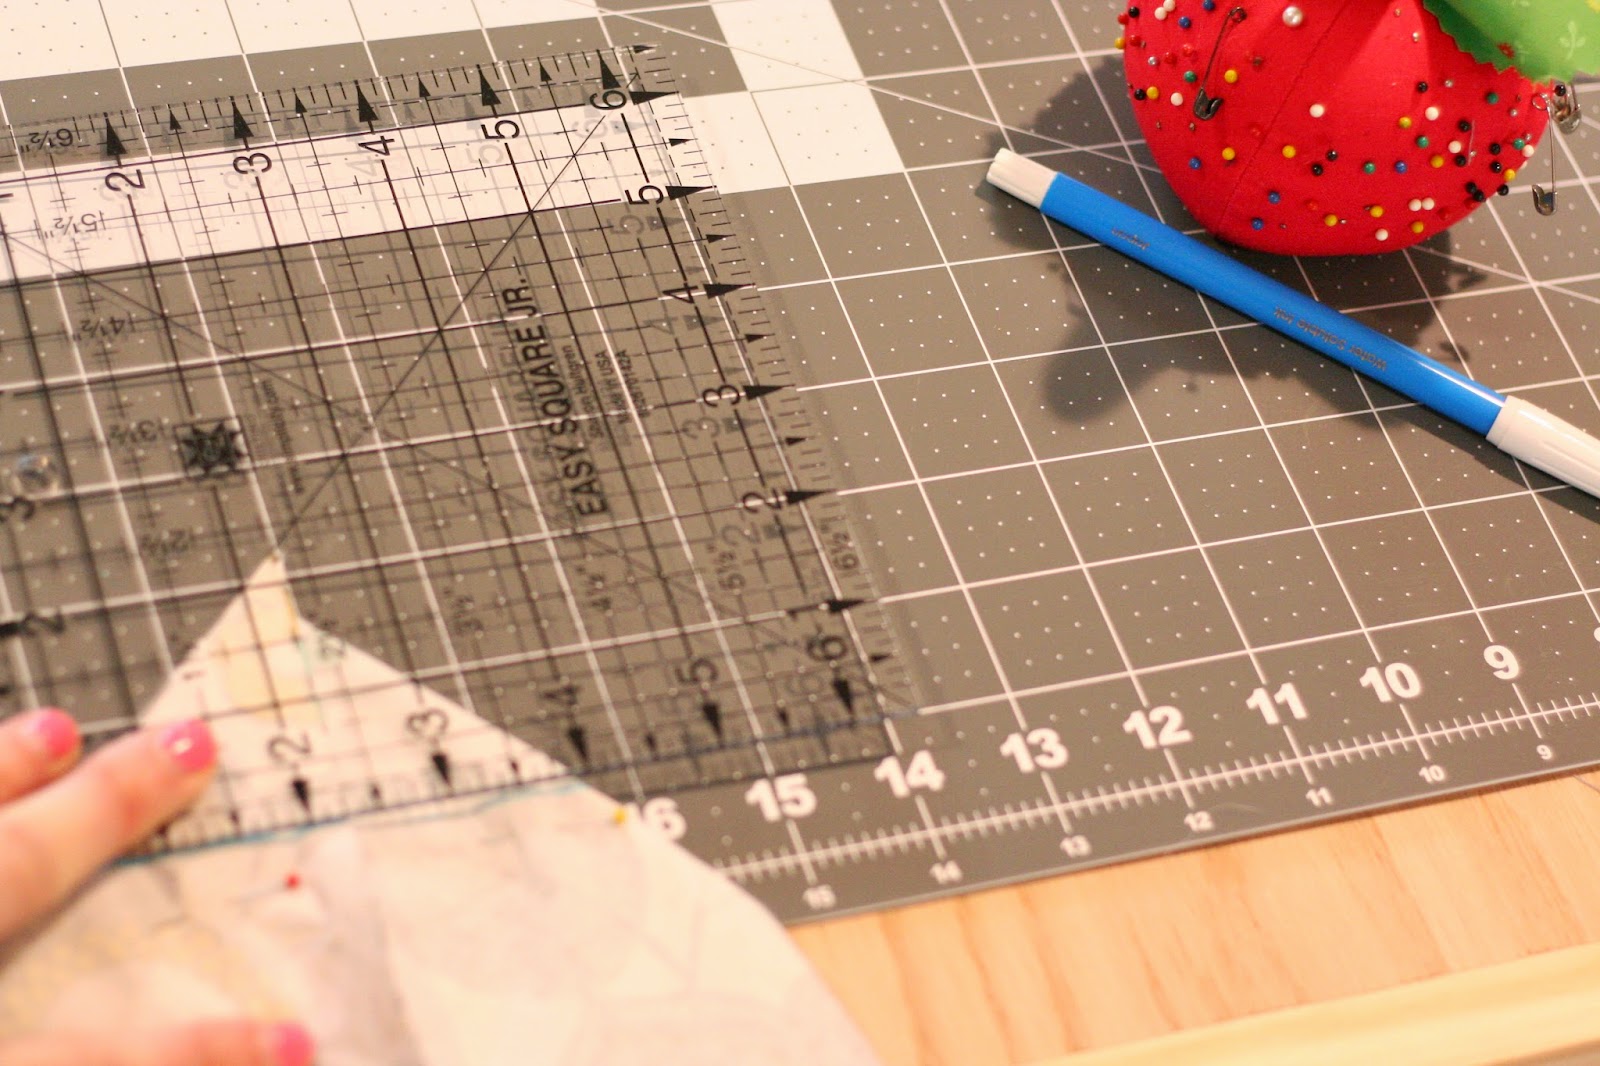
The other kind of irregular thing about it so far is that the hex template I had printed out from a Craftsy tutorial just never seemed quite....symmetrical. I could sometimes find a better fit between pieces by rotating them, which, as sort of a geometry professional, I knew was not right. On my last trip to the fabric store, I was enticed by a sale and picked up one of those fancy rulers shaped like a hexagon. I thought, I'll just cut out some new 5" paper templates and keep going. Sure, the first 3 blocks will not be QUITE the same, but it's ok and it will make the rest of the assembly much more smooth. It seemed like a valid plan.

I cut out a small stack of perfect 5" hexagons and set one in the negative space next to a completed block. In no way were the blocks I already had 5". At best, 4.5". While yes, I'm not exactly far along in this project, I HAVE already cut up a bunch of fabric for more blocks based on that original template. If I went up to a true 5" block, I'd have to really start over and that seemed like a waste. Instead, I painstakingly trimmed a bit at a time until I came up with an ALMOST perfectly symmetrical template the same size as my "5" lying wonky templates that I could use going forward.


It was really annoying.


However, I did manage to piece together the three irregular blocks I had already completed (note the wrinkliness from the wine bath, and further wrinkliness from not being perfect hexagons) - the front three in the photo above. I also took a few deep breaths and put together a fourth block (the orange one in the back), which happily took only about an hour. (For the orange block....not the rest of my whining.) As you can see, even though the fabric itself suffered the same wash as everything else, symmetrical hexagons make the whole thing lay much more nicely. I think I'll make the wonky flowers (that's what I'm calling them) the center of the quilt, and surround them by my now even new blocks.

Here is the whole thing draped over a chair in the dim February morning light for scale:


Slowly but surely, it's growing. Slow yes, but still faster than a fingering weight cardigan. For now I might focus my knitting energy on socks - I have a new two at a time pair going and I've turned the heels, so I'm in the home stretch!

Finally for today, I have to put a brag here. I don't talk a lot about my personal life, and if you are friends with me on facebook, you already know, but I am so damn proud I want to shout it from the rooftops. WE HAVE PAID OFF OUR STUDENT LOANS!!!! We graduated with two bachelor and two masters degrees between us in Dec 2006 and May 2007. We got married in October of 2007, so the majority of that total amount has been paid as a joint effort. Which, just for kicks and for the record, was an original loan amount of, drumroll and scary dun-dun-DUUUUUN music please, was $125,500. One hundred and twenty five thousand dollars. That's a modest house here in the midwest. Luckily we are both gainfully employed in our fields, so these degrees and that money isn't just in the wind, but, ouch.

I'm not entirely sure my husband felt the weight of it the way I did. I'm the money and budgeting half of our relationship. Before me, he had a little credit card debt. When we got engaged, I took away his card and added him as an authorized user on mine so that we could focus on paying his off. I am allergic to having a lot of expenses I can't just write a check to cover. Yes, I do sometimes make payments on 0 or 1% interest plans. I calculate it out to make sure I pay the whole thing off at least a month before that interest kicks in. I'm frugal, sometimes to a fault. If I'd had complete control over paying off our debt, I'd have been so crazy about it that it would have been gone a few years sooner, but likely so would my husband! He's more the type to buy the bar a round, where I'd be sipping water or nursing a single glass of wine to stretch my pennies. Needless to say, we compromised.

I can write more about how we pulled this off if people are interested. We aren't rich, far from it. We started out with pretty modest incomes despite advanced degrees - it's the nature of our field. We've grown over the past 7, almost 8, years of debt repayment to a fairly comfortable income, but still nothing terribly impressive when you put it up against pharmacists or most business majors (I'd guess). As I said, we took on the full load in 2007, but I got really serious about paying this off in 2010. I haven't always been able to stick to my plan exactly - life changes, job loss - but the basic timeline has come out much the way I'd hoped. I'm not sure what we'll do now. Paying bills next month will probably feel like we've gotten a huge raise! I have a couple of ideas, sadly none of which will likely involve a spur of the moment trip to Tahiti. We've got more changes coming up this year that will shake up the budget picture, but I am honestly so happy and so relieved that this burden has been lifted.

To celebrate I bought my knitting group a round of cookies last night. I haven't completely turned over a new leaf though - I waited until after 6 when they were half price!

Wednesday, February 11, 2015

Personal Day


It's been an incredibly busy two weeks at work. So much so that I ended up sleeping most of Saturday to recover from a few straight days of big meetings and travel, and enough extra hours to take a day off all to myself. I didn't get to sleep in much, but I did get to knit a bit on my Quaker Ridge Shawlette while I watched the latest episode of Downton Abbey. (Wow, what an episode!) Yes, lord help me, I'm knitting a shawl. I tell myself that it's just a big squishy scarf and I'm not 100% an old lady just yet. And it IS nice and squishy, as I'm using a pretty tonal shade of malabrigo Arroyo in Aguas. I'm a little worried about running out of yarn. My calculations have me running out at the cast on row, so perhaps I'll just do one or two fewer rows of the ruffle. Those are mighty long rows to have to knit backward.


I also got to putter around in the studio a bit, clearing off the big table, getting things in order. The shelves still need their trim pieces, but I just haven't gotten around to it. I started filling them instead. I finally found a cute little tin to corral my double pointed needles. I mean, I hadn't actually been looking that hard, but I found it in the dollar spot at Target.


I plan to get a rotary cutter this weekend. It's been on my list for quite awhile, and I think the time has come. I tell myself it will make my cutting much more even.


I dipped a toe back into sewing with a couple of little project bags. I wanted them to be sturdy so I interfaced the outside fabric. The stuff I had on hand was really too sturdy for the job, but I didn't feel like making a special trip out. I did make the bags a bit harder to work, and harder to line up the seams as you can see on the fruit print bag. Oh well, learning experience. They're just for me anyway. I'll have to pick up some ribbon to make the drawstring closures. I might get a zipper too to make a larger wedge type bag for sweaters or a baby blanket or something. These bags are good for socks and mitt size projects. I thought it would be nice to have something a little cuter to corral my projects than the makeshift bags I've been using - which are actually the casings to a couple sets of twin sheets! They work pretty well, but I've been wanting to dip a toe back into sewing and this seemed like a nice quick project. It would have been quicker if I hadn't made a few dumb mistakes! If the directions seem goofy....there's a good chance it's operator error. :)

Thursday, October 23, 2014

Some thoughts on pricing on Etsy

Crochet Booties


The holiday season is quickly approaching, and for handmakers, now is the heart of the busy season. As soon as the calendar clicked over to fall, I could see my Etsy shop views and favorites start to double....and even triple. I've been making enough sales to keep me rather busy, but I'm not overwhelmed just yet. However, making products, listings, re-listings, shipping things out....it's all got me to thinking a lot about the way I run my shop and the way I've set my prices.

Want to know a secret? When I opened up my shop, I had no method to pricing. None. I simply threw out a number that felt sort of ok and went with it. I sold quite a few kids hats in the early days, and I priced them all pretty much the same. I thought, well, a kid's hat should be about.....this much, and I held that price despite differences in quality of material, varying complexities in pattern or color changes, and just went with it. I did price enough to cover the cost of materials and a little bit of pocket money to, most likely, buy more materials. But for my time? I pretty much didn't get anything for my time.
Slipper Socks
Don't get me wrong, I love making things. But when you are taking time from your family, your leisure time and your own hobbies....you sort of want something to show for it in return. I don't think that's greedy, I just think that's fair. Ironically, the more complex and time intensive a project is, I'm more likely to give it as a gift than for something for sale. I recently had someone inquire about the Nova sweater dress I'd knit to see if I'd ever consider making them for sale (by the way, thank you SO much for your interest! That was so sweet!) My first instinct was, good lord, how would you even price a whole sweater?! I mean, I can't just say $40 because that's what you might pay somewhere like baby Gap, because what if it takes me a month? But I also can't just say $300, because that's astronomical.

So I decided to actually work it out. What WOULD it cost to make that dress? In the past, I simply searched for similar items on Etsy and priced myself sort of in the low end of the middle of the pack. But after doing a bunch of research, and an incredibly enlightening conversation with the lovely and talented Elizabeth Ivie of Ivie Baby, I came to the conclusion that it makes MUCH more sense to look at my actual process and workflow to set my prices. I made myself a little spreadsheet, and it really opened my eyes. Even for the few existing items in my shop, I was paying myself a really wide and nonsensical variety of rates....some as low as $2/hr. Wow. What's minimum wage these days? Somewhere around $7? I've definitely done those jobs, as cashiering and filing work bought my first car and got me through the early years of college. Knitting and sewing certainly feel like more skilled labor than swiping canned food through the scanner. And yet I was only paying myself a fraction of that rate. And why? I'm certainly much more proud of anything I make in my shop than I was of those neatly alphabetized files.

I'm still working through it, but I think I've come to a couple of conclusions. First, an hourly rate doesn't make sense for knitting. For example, it takes me about 3 hours (roughly - I rarely have that much time in a single block in order to measure this!) to make one mitten. Double that, because most people order two mittens, and we're up to 6 hours. Conservatively, another hour or two for finishing work (it ALWAYS takes longer than you think it will!) and the cord....now we're up to 8 hours. 8 hours x $7/hour = $56. FIFTY-six dollars. FOR BASIC KID'S MITTENS. They're cute. But I'm not certain they are $56 cute.

Toddler Mittens

So....hourly rates for knitting sort of don't make sense. However, an option commonly used by commission knitters is a rate per YARD of knitting. This can range from $0.15-0.25 per yard of yarn depending on the difficulty of the pattern. I can easily do some mathematical wizardry (ahem multiplication and division) and figure out how many yards of yarn I'm using based on the total yards in the skein of yarn and the weight of the finished object. It's been pretty enlightening for me to work those numbers on the current (and super long list of potential future) items in my shop.

Hourly rates DO make sense for sewing though. Yardage doesn't, because yards go by in a snap when you're talking fabric! Plus there are all kinds of other details from cutting, actual sewing, finishing, and details like buttons, snaps or zippers to consider. Elizabeth said that she looked around at what professional seamstresses charge, and set her rates accordingly. When you are selling independently, you are not only the designer and maker, but you are also responsible for all of the back of house accounting, billing, shipping and marketing - those overhead costs really should be factored into your rates.

Even if you are selling as a hobby, it's important to price your work fairly. Some people are doing this as a full time gig, and it would be wicked tough to survive at $3 an hour. I've been working on a pair of socks (off and on) since June. So given the time investment, and the fact that good, solid quality sock yarn can cost $10 on its own, it's sort of heartbreaking to see people selling a pair of handknit socks for $12. I don't think you can even get Smartwool socks for less than $20 without some sort of monster sale! Obviously everyone should do what feels right for them, but the implication to buyers might be that ALL handknit socks should be worth $12, and I just don't believe that's true.

Snap Scarf
 I realized one more thing that I think is key for me to keep in mind. I - and other crafters and makers like me - might not be my ideal client base. Let's face it, I learned to knit and crochet and sew and who knows what else because I want nice things for just the cost of materials. I'm WILLING to invest my time and energy into learning these skills and into the time it takes to make them. I am not willing to pay for someone else to do this (mostly - I do still buy handmade from other people when I just don't have the time to pull something off or the desire to do it as well as they do!). It's important for me to realize that other people would much rather make the trade off to pay someone else to do the hard work and for them to buy the finished object. After years and years of mass production, there are plenty of people out there who actually want to seek out artisans to make them beautiful handmade things. And THOSE people are my actual client base. They understand that the cost of handmade goes beyond the wholesale price of paper and ink, or yarn, or fabric. It's much more than that. It's time. It's talent. It's hard work. And it's care.

So those are my thoughts on pricing these days. How do other people do it? What is handmade worth to you?