Tuesday, August 12, 2014

The year things grew

I must say, this is the best my garden has ever looked! It makes me regret limiting myself - I wish I'd grown all the things! In about a month or so, we've gone from this:


to this!


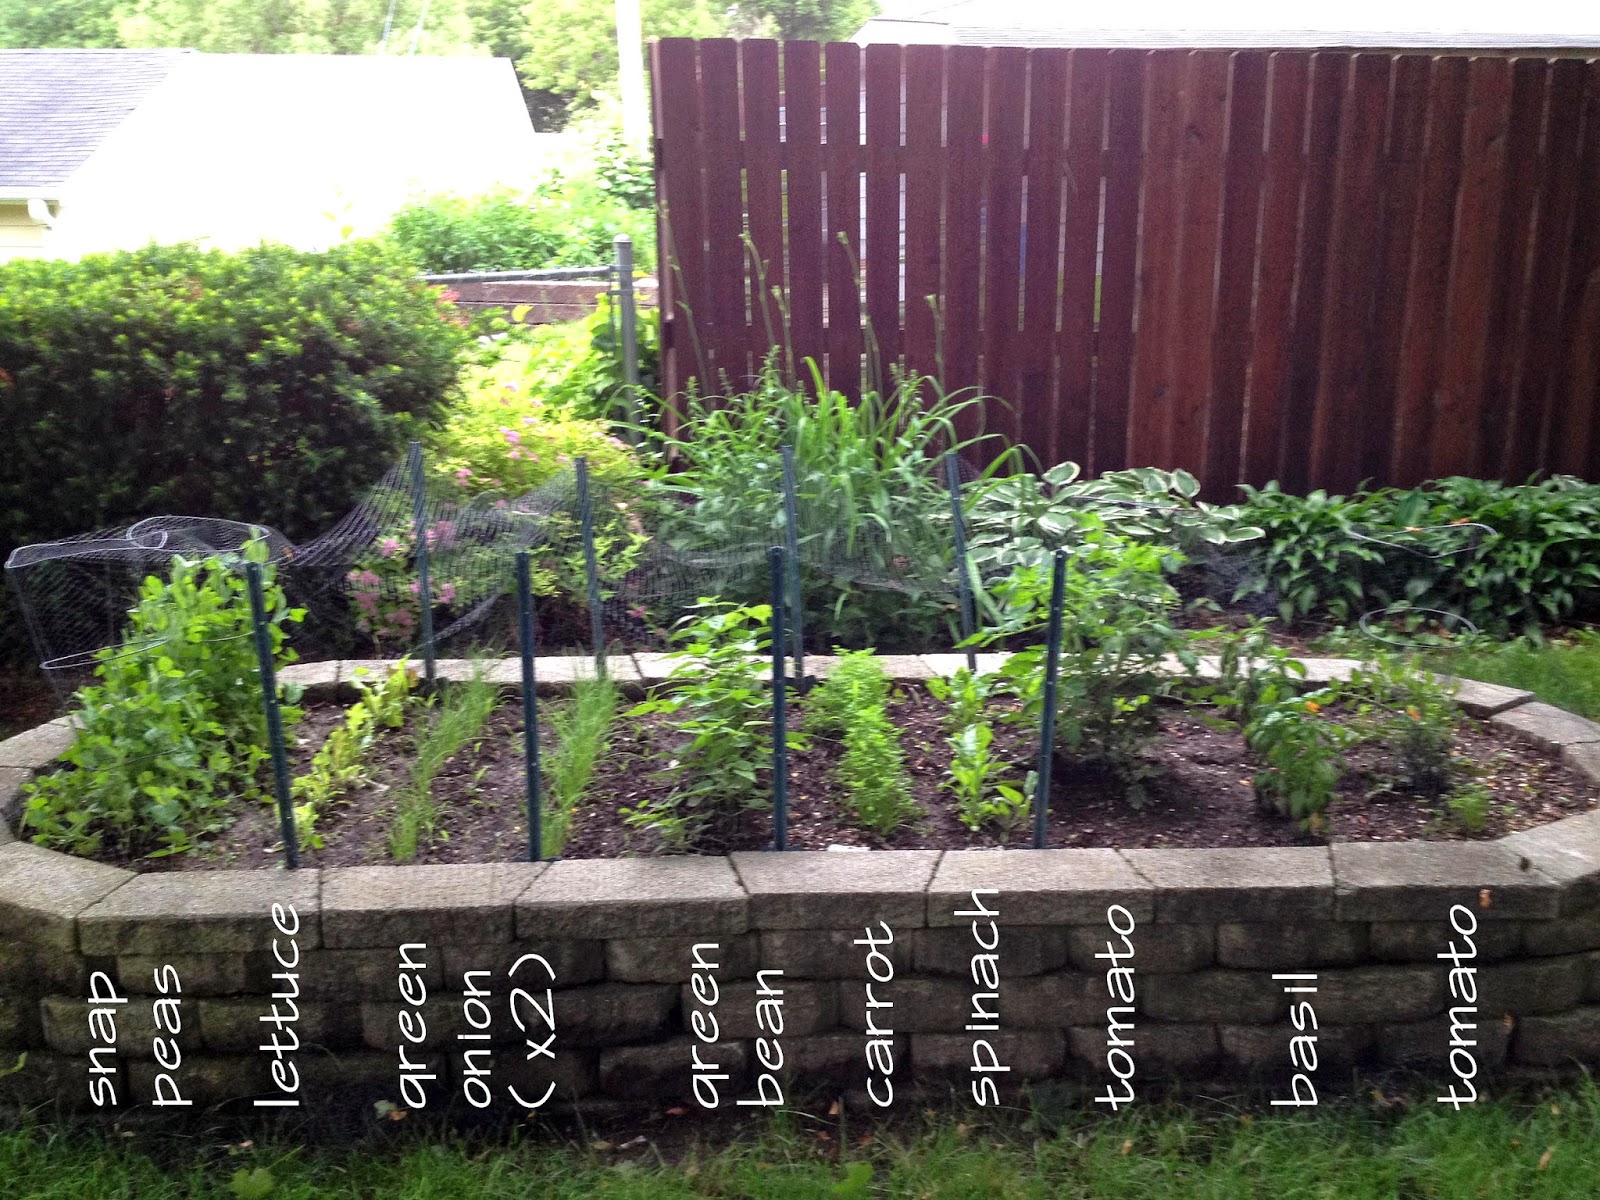
Despite feeling like I got a late start this year, I managed to get a few peas, and the lettuce recovered from the early weed attack.


I've even managed more than just the one salad I thought I'd get!


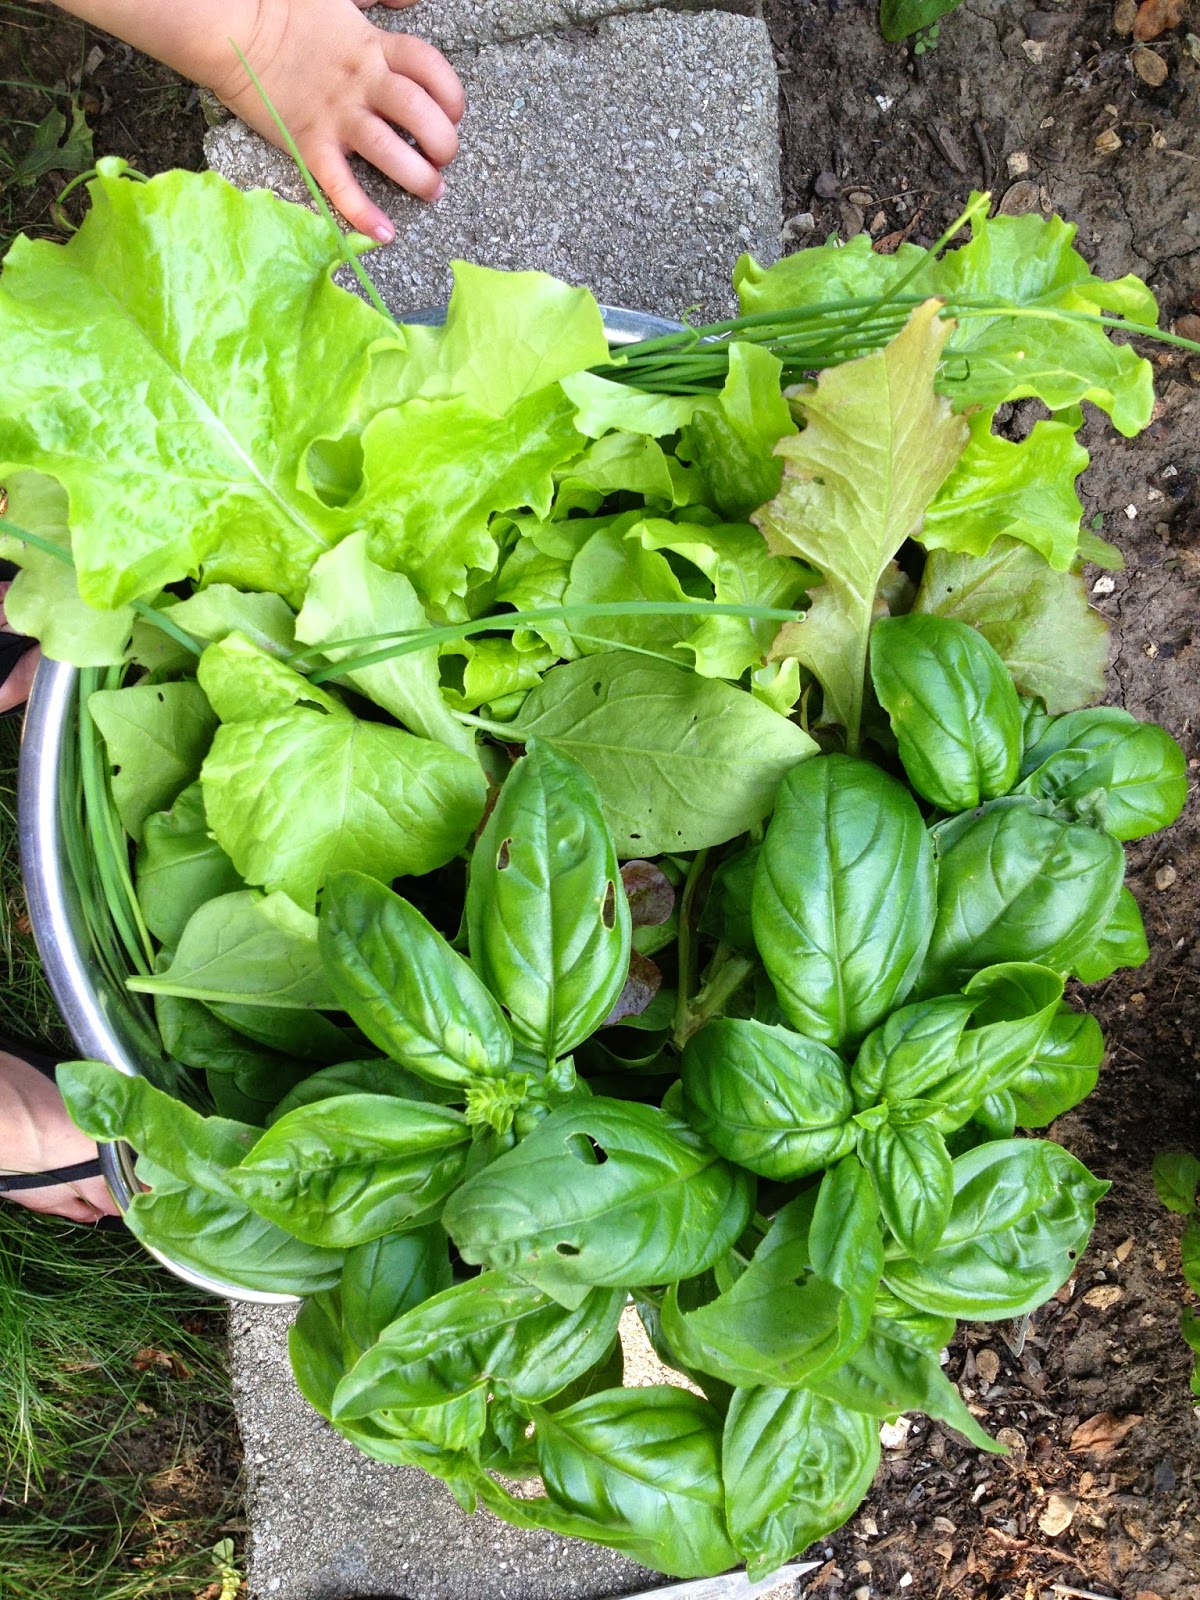
I ate some of the beautiful basil in the bowl above that day, but I put some of the stems into some water by my kitchen window. I read about rooting fresh basil into more plants a few years ago from Benita at Chez Larsson. I miss her blog so much! I follow her on Instagram, but it's just not the same.


Uh. it's possible I left them in there too long..... Also I need to wipe my sink.


All nice and transplanted - I hope they take!

My tomatoes are doing well, lots of fruit on the vine but nowhere near ripening. Ok, one plant is doing well, the other is doing nothing. The one doing well is doing double duty or something. I had to grab a spare fence stake to try to secure the seemingly useless tomato cage. I think I might have to try making my own like Kit from DIY Diva did next year.


Beans are coming like crazy too! I put them in this 3 bean salad I saw on Pinterest, and it's pretty darn good!


Still to come this fall, I set some garlic out on a windowsill, and I'm hoping that I'll get some shoots I can plant this fall for new bulbs next year. I may plant some more spinach and lettuce from seed yet this year, though honestly it's been so cool that my original plants are still producing! What a crazy summer. The growing season has gone so well this year, I'm thinking all kinds of crazy thoughts, like that I might finally pull the trigger next year and plant myself a berry patch. I've loved having the strawberries so much, that I'd really like to have raspberries and blueberries as well. And as for veggies, maybe I'll try some green peppers and cabbage next year! I know cabbage needs a lot of space, but I've heard you can grow it in a large pot. Has anyone tried that? I'm also considering planting a pumpkin or two, and maybe some cucumbers. I might let the pumpkin run a bit, but maybe something like Kit's strong tomato cages might be enough that the cukes could crawl up them? I had good luck this year training the beans to climb the cages and not take over the whole garden, and I'd really love cucumbers too. Just watch....not one thing will grow next year.

Thursday, August 7, 2014

Howard Hoodie sneak peek

I'd planned to have a more finished and polished reveal at this point, but when summer evenings beckon in a land where winter seems to last 9 months of the year, you roll with it. That being said, I do have a little something to share!

About two weeks ago, I shared this even smaller sneak peek:


It hasn't always been a full fledged intention, but I'm dipping a toe into pattern design. I suppose, it was only a matter of time - I design in my day job, I've been knitting and crocheting for long enough now that it doesn't feel false, and I've got a head for details. Plus I took an even smaller step in several months ago with my free pattern for an infinity cowl that has been fairly well received. I started out with the sketch you see in the photo above. I was inspired by a couple of things. The shape of the hat, or "hoodie," as is a popular term around the cozy cape cottage these days, is reminiscent of the twin baby bonnets I made a few months back. I modified it to be a bit larger as I wanted it to attach to a scarf or cape of some sort, and I love the rolled brim detail on a small sweater we were given a few years back. For this winter, the attached scarf detail has definitely been something I've been percolating for awhile. My sister has really gotten into snowboarding the past few years, and she brought her balaclava with her last time. I really enjoyed teasing her about it because it looked so silly, but it's actually really smart because it doesn't let in any of that cold air or snow, so I'd put it in the back of my mind that a cuter version of that would be GREAT for kids. It would keep them warm, and you wouldn't have to worry about them getting tangled up or choked by a separate scarf. Plus there's the added benefit that you can't lose it if it's attached! I went back and forth about some kind of infinity scarf, maybe it looped once or twice, but eventually I settled on something that looks more like a cape and buttons at the neck - off to the side so it shouldn't annoy little chins or cheeks! I'm a fan of a little intentional asymmetry.


I think there's definitely an alternate design in here where the whole thing is worked in garter stitch. It would have the benefit of almost no purling (I'd still keep the stockinette in the front for that little rolled brim), and garter is a bit warmer in my opinion. For this self striping yarn though, I swatched a garter version and I just didn't like the way the colors fell as much as in stockinette. You can see in the photos above the outside pattern versus the inside - garter stitch would have made both sides look more like the bottom photo, which I just didn't like. I think it could be great in a solid though, so I'll probably write up that option as well.


I finished up the sample last night, and immediately decided I wanted to change it. I think the second set of increases is a little too much, so I think I'll go back and re-do those. While I love a ruffle, I don't like it in this context - the bottom needs to lay a bit flatter under a coat. I know how I want to change it though, so I should be able to have the pattern written in legible, not chicken scratched out notes to myself in the next day or two. I have one tester all excited to cast this on, so let me know if anyone else out there might be interested in test knitting this as well! As far as details, this took a single skein of Universal Worsted Tapestry which is just under 200 yards, and fits a 2-3 year old. I'm planning to work up sizes for 6 and 12 months as well, and maybe 4-5 year olds, though that might take more than a single skein. A contrast color edging would also work if you didn't want to buy two skeins and do a little stash diving instead. So there you have it - a sneak peek of my new design, the Howard Hoodie! Let me know what you think!

Tuesday, August 5, 2014

Etsy shop update!


My goodness, it's been ages since I updated my poor, neglected Etsy shop. The largest part of this is due to the fact that I really want to completely overhaul it. Once I get my basement studio completed, I plan to set up a few areas where I can easily take product photos. I can't wait to get good lighting, a tripod, and some consistent props and backdrops. We (ok fine, mostly my husband lately) are making pretty solid progress on the space, but we have busy jobs and other responsibilities that make it hard to just dedicate a few solid days to getting a lot done down there. Despite these setbacks that make it easy for me to make excuses, I got myself together to show off a new product line!


About six months ago, I was contacted by a friend on Facebook to make a pair of baby booties for her sweet baby girl who was born this summer. I loved them so much, I always planned to list them in the shop...but I couldn't hold on to them long enough to actually get them up there! I think in all I've sold four pairs so far, which is pretty good considering they weren't technically something I was offering!


Aside from the fact that these are tiny (I can do sizes 0-6 month and 6-12 month) which automatically make them adorable, the yarn is a real star. It's a long repeating gradient yarn from Knitpicks called Chroma, and it's gorgeous. It's 100% wool, which means handwash and lay flat to dry, and it's one of the softest things I've ever felt. There's just a slight fuzzy halo around the fabric which makes them perfect for sensitive little baby feet, and a total bear to rip back if someone makes silly mistakes while crocheting them....don't ask me how I know.

Because of the gently transitioning colors, I couldn't take the "make to order" approach that I do with a lot of my other listings, because this makes each pair totally unique depending on where in the color repeat I begin and end. I didn't exactly want to start out a new line by stocking every color line, so I started with one color that lent itself to boys, and another to girls. I'm not a stickler though for strict gender lines around colors though, so to each their own.


As of Tuesday, I've got one of each colorway listed in the shop - you can find the PINK here and the BLUE here. Check back on the shop (you can always find a shortcut at the top of my blog) for new versions of these colors, and new ones in the future! I'm excited to see how these will be received, and thanks so much to the lovely ladies who have already purchased for giving me the push to make these cutie booties!


Thursday, July 31, 2014

Get out of town

In a move that surprised no one more than me, I decided to go on a getaway weekend...camping. This is surprising because I'm not what anyone would consider...outdoorsy.


I also do NOT pack light. My sister goes backpacking. I don't even know how we are related.

Because we don't camp, we have not much in the way of gear and had to borrow most of it. Thanks guys! My neighbor let us test out both of her tents.


We had actually decided on the larger one hiding behind the sheets (man I love the smell of line drying, and we even get pretty lucky with the birds not leaving us presents despite the lines running right below a huge tree), but we were told it wasn't quite waterproof. We ended up bringing both (see, I don't pack light), but only pitching the little one on the right because there was a 50% chance of rain. It was....cozy, but considering this was a little getaway, we didn't mind the close quarters. I never come out on the right side of 50% crappy weather odds, but we did this time. Probably because we prepared!


We also borrowed these sleeping pads, and I will say that the blue one (similar here I think) was SO comfortable! It's self-inflating, and while I felt sort of like a moron watching it because I wasn't positive it was actually inflating, I wasn't sore at all after sleeping on just that. My husband layered two of those foam pads and said his arm and hip were falling asleep laying on his side. I took this picture to send to my backpacking sister, who also thinks the foam mats are uncomfortable. Look, it's just as small!

Anyway, I did basically no research on the park we decided to stay at, which is also a change for me. The times I've camped in the past, I spent a ton of time looking at maps and reviews and pictures of the actual sites. This time, I simply picked a weekend, found a place that had available sites that wasn't 4 hours away, and just booked it. While we did have a really nice, relaxing time, that may have been a mistake. Our site was totally not private, was mostly pit toilets, and they didn't allow alcohol?! I don't remember seeing that on the website. We went ahead and operated under the assumption that no one would care as long as we didn't bother anyone!


Isn't it strange when the man-made influence becomes so obvious even when you're supposed to be in nature?


We did manage to catch a peek of real nature as well. Two little fawns, one quicker than my camera. We didn't see her, but figured the mother must have been there as well.


Another crazy juxtaposition of the quiet and pretty empty forest to the left of the bridge, and a floating redneck trailer park on the right. I totally didn't understand all the people partying on boats...right next to the road. Trust me, you're glad I didn't take a picture.

Our exhausted little buddy. He's not been feeling so well lately, so we didn't take a very long walk. Three weeks ago he started not walking on his back leg. We had him examined, but he still wasn't using it after a week and a half. I scheduled an x-ray, so of course he started walking normally again. Luckily I was able to cancel and save a couple hundred dollars, but it would have been nice to get his teeth cleaned while he was knocked out! Oh, the breath! He's still acting sort of off though...I hope he gets better soon!


 This last one is a joke for those who know and love him - the breaker of all the things struck again! He's lashing together his folding chair with string. I guess it was "time for it to break." In the interest of full disclosure, the chairs cost about $7 each a few years ago, and the fabric on mine MAY have also ripped that weekend. I still maintain he must have sat in mine too!

Tuesday, July 29, 2014

Golden Rippy's Delilah Top

A few weeks ago, the lovely Rachel of  Golden Rippy  put out a call for bloggers to participate in her very first pattern tour (including a giveaway at the bottom of the post!!) in one of our Facebook groups, and I jumped at the chance. I haven't had the opportunity to sew much for myself in recent years, so I thought this would be the perfect excuse. In addition, I've never sewn with knits before, and, well, no time like the present! In hindsight, I also don't have much experience matching up stripes, so choosing a striped knit (from Joann's) MAY not have been the wisest move. It turned out well enough in the end, but I could still use practice.


This is a great casual top, but I've actually worn it to work as well, dressed up with some black pants. I opted not to add on the bow or flowers for my version, but I plan to make the little girl version as well (the Dalia) and will likely add a little something to that one.


I must have been subliminally influenced to choose something with a little sparkle by the cute cover photo!


Rachel's directions were really clear, and it was easy to lay out the pattern sheets with the translucent numbering and arrows on the sheets. I often have trouble finding tops that are long enough, which is why women's top patterns are appealing to me. I decided to make this one per the pattern, and quite like the length! It's great with jeans, but I could also see making one several inches longer to wear with leggings.


I did my best to keep the fabric from sliding around as I cut the pieces in an effort to match up the stripes, which was moderately successful. Not perfect, but pretty good!

As far as sewing on the stretchy fabric, I played around with many of the stitches and tension, length and stitch width on my machine, which is a basic Brother PS-1000. I've heard things about knits being difficult to sew without a serger, so I was a little worried and tested out some of the stretchier stitches. For the most part though, I ended up just using straight stitching and didn't have much trouble with it. I just made sure to adjust my length and tension enough on a scrap piece of fabric so that I didn't get any bunching or loose threads on the back side.


Overall, the sewing went really smoothly, and adding the trim along the neckline and sleeves was really simple with Rachel's instructions. The only bump I ran into was with the waistband. I got the whole top together, tried it on, and it just wasn't quite snug enough.


I had hoped for it to be tight enough to be able to stay up on my hips. (On the plus side, check out those matching side stripes! Not quite as nice on the shoulder, but oh well.) I must have lost my mind when I took it off, because I made it about 6" shorter! It DEFINITELY didn't need to be taken in that much! I did quite a number pulling on the shirt fabric to get it reattached, that when I ultimately realized I'd made a mistake in taking it in too much, I was worried that I'd stretched it out beyond repair. I cut a new strip for the waistband just an inch and a half shorter than the pattern calls for, and that was just right. Luckily the fabric bounced back after a trip through the wash!


I love this top. It's so comfortable! The drape of the fabric and the little gather at the waist give it enough shape and movement without being tight, which is awesome.

So here are the details if you'd like to make a Delilah Top of your own. The pattern includes:
  • illustrated instructions
  • six sizes  XXS to XL
  • 2 sleeve lengths
  • 2 embellishment options
  • printing guide
  • pattern layout guide
  • grainlines
  • 28 page PDF pattern download to make the top
  • fabric yardages for 45″ and 60″ widths
  • pattern pieces with seam allowances
  • professionally designed and graded pattern
Want to win the pattern? 


Prize Package & Rules

Two winners will each win:

            * 2 Patterns of your choice from Golden Rippy


The Contest Rules:

You must be 18 to enter.

You can gain entries by entering the Rafflecopter Prompts.

Giveaway ends: 8/6/14 at midnight PST.
Two winners will be chosen and announced on 8/7/14.


a Rafflecopter giveaway

Also be sure to check out the pattern on these other blogs in the next several days!


Monday- July 28

A Vision To Remember  www.avisiontoremember.com

Fabulous Home Sewn    http://www.fabuloushomesewn.blogspot.ca


Tuesday- July 29

FriendsStitchedTogether     http://friendsstitchedtogether.com/

Cozy Cape Cottage    http://cozycapecottage.blogspot.com/

Gracious Threads    www.graciousthreads.ca

Wednesday- July 30


The Sewing Geek    http://www.thesewinggeek.com/

Sprouting JubeJube    http://sproutingjj.blogspot.ca/

Thursday- July 31

My Taylor Made      www.mytaylormade.blogspot.com

Mimi's Mom      http://www.mimismom.com

Rebel & Malice  rebelandmalice.blogspot.com

Friday- Aug 1

Stitchwerx Designs   http://stitchwerx.net


E-beth Designs   http://ebethdesigns.com/

Saturday- Aug 2


Marmalade Forest   www.marmaladeforest.com

Ali Cat & Co    alicatco.blogspot.com

Sunday- Aug 3


Monday- Aug 4


Tuesday- Aug 5

Mae & K    http://maeandk.com/

The Crazy Tailor   http://thecrazytailor.com

Blogs Like A Mother   http://blogslikeamother.blogspot.com

Wednesday- Aug 6

Bebe Lambs    www.bebelambs.com


Lady and the Gents    www.theladyandthegents.blogspot.com
 

Thanks so much to Rachel for providing me this cute pattern! All opinions, mistakes and rambling are my own.